


DSLR Astrophotography 101: Photo Editing
Welcome to the third installment of OPT's DSLR Astrophotography blog series, where we're focused on fine-tuning our photos of the universe. If you missed our previous lessons, we encourage you to check out theDSLR Astrophotography Intro andExposure posts before proceeding with this blog.
Since we've now covered the basics of astrophotography and how to properly expose our shots, we're moving into where the magic happens: Photo editing and processing. In particular, we're going to put a heavy focus onstackingand how it brings the best out of our shots.
QUICK SUMMARY:
- Image stacking compounds the signal from many shots into a single image.
- Stacking can produce the cleanest, most refined, and highest resolution images.
- Images exposed to the right (ETTR) maximize the potential data in our final stacked product, and even images exposed to the left (ETTL) can be saved through stacking.
- Photoshop can be used for both stacking and aligning but falls short in astrophotography.
- Dedicated stacking software is required for pixel-perfect alignment.
- An equatorial (EQ) mount or camera tracker is highly recommended to maximize the amount of data to stack.
ASSUMPTIONS
As usual, we've got to get some assumptions out of the way: If you've come this far--especially if you've been a photographer before this series, we're assuming you're familiar with using Adobe Photoshop.
We're assuming you've read the previous blog about exposure and know what ETTR means. Hopefully, you've employed this technique since last we met because we're going to need all the sweet, sweet data we can get for processing.
Now then, it's time to get started.

IMAGE STACKING
Think of this: Let's say you are using a high ISO and you take only one picture, how can you tell the difference between small stars and noise?
We haven't figured out a way to tell from a single image, but what we do know is if we take a bunch of photos of the same object shot with the same settings, we can use those images to stack out the noise.
Image stacking is, essentially, aligning a bunch of images, layering them on top of each other, then assigning the average or median values of each pixel within each layer into one single image. Image stacking strengthens the signal of the photograph, which in turn reduces noise and increases resolution.
The cool part about stacking is the more photos you stack, the better the noise reduction will be. The math is pretty simple to figure out the relationship between the number of shots stacked vs. the effectiveness of the noise reduction. It's all based on the index of two.
Log2 (no. of shots stacked)=stops of noise reduction
Or
2stops of noise reduction= no. of shots stacked
So what this means is every time we double the number of images to stack, we gain one stop of noise reduction. For example, if two images are stacked, you get one-stop of noise reduction. If you stack four images, you get two stops of noise reduction, eight images equals three stops, and so forth.
To illustrate this effect, take a look below.


Adorable, isn't it? This little critter was captured at ISO 6400. We don't have to look too closely to see the noise on and around the left hippo. Comparing it then to the hippo on the right, we're probably in agreement that the stacked image looks a whole lot cleaner than the single shot. Even after shooting at such a high ISO for so many shots, there's almost no noise whatsoever.
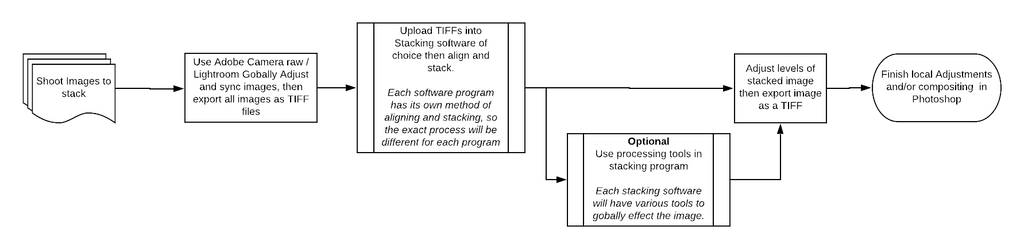
Image Stacking With Photoshop
Here’s a chart to show you step by step on how to do it.
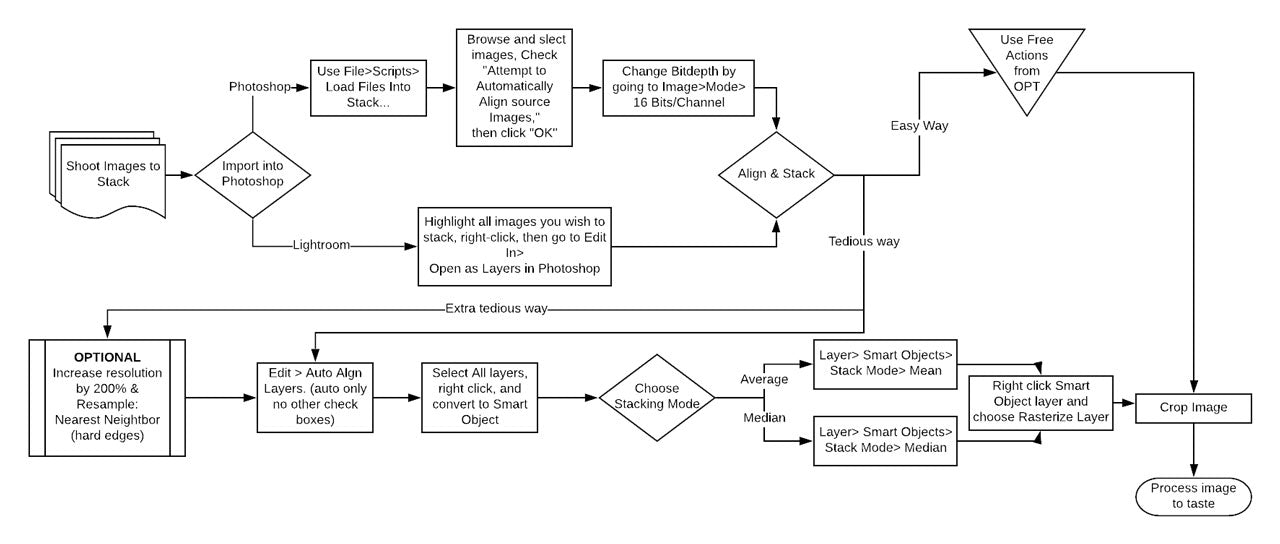
Photoshop Alignment and Stacking Flow Chart
Once you've made it to the end of the chart-- that's it! You've stacked! Now you're free to mess with levels, curves, gradients, and whatever else you need to make that image pop!
To make this easy, we have put together a Photoshop scriptthat you can download and run. The script only works after you have imported the images into layers, but basically, it takes care of everything after the "Align & Stack" choice point in the flow chart above. "Align & Stack" effectively takes all of the images you've added to Photoshop and goes through the aligning and stacking processfor you.
LIMITATIONS OF PHOTOSHOP
Imagine you got a series of beautiful wide-angle shots with a clear sky and a mountain range below. You exposed to the right and may have taken ten, twenty, or even sixty(!) exposures of one particular scene. You shot it perfectly and have a lot of data. You head on home, transfer them all to a computer, then use Photoshop's auto-align function, start to stack them, and bam! All the stars are faint and smeared! The mountain range looks great, but that's it. What gives?
Photoshop is excellent for processing astrophotos. But, it isnot great at aligning astro-images. Yes, we just did that with the hippo, but that is a static object in the image. Photoshop is exquisite in aligning static, easily recognizable shapes, but when it comes to pinpoints (stars), it falls short.
The image below shows what we mean by combining ten, ten-second exposures with Photoshop's automatic alignment, then stacked.
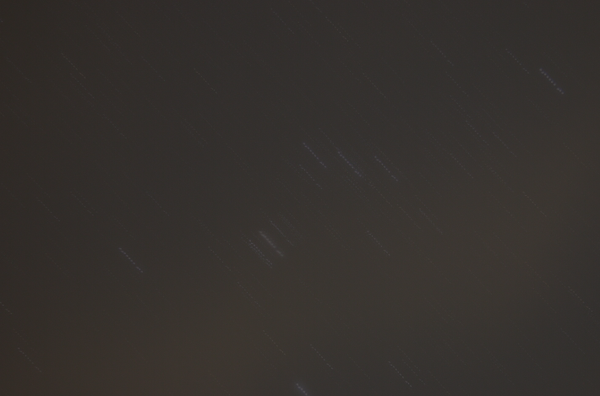
This highlights the inherent flaw in Photoshop's stacking software with not recognizing and prioritizing the pinpoint stars we want to align on. We don't hate Photoshop. The program just wasn't designed with astrophotography in mind.
Now, some people will tell you how it's possible to align your images in Photoshop by painstakingly rotating manually… and scaling… every single layer one by one… for hours… but we're not that cruel. The manual alignment will surely foster your first inklings of insanity.

So instead of breaking our minds and potentially our computers out of frustration, we can take a look at the other software options that take care of this issue for us.
STACKING SOFTWARE
Using the same ten exposures from that blurred image above, this picture below is the result after using proper stacking software--and, of course, some touch-ups in Photoshop.

Stacking Software x 10 Exposures and Photoshop Adjustments
It looks quite a bit better, doesn't it? And that only takes a few minutes once you get the hang of it.
Stacking software is what's best for getting our images aligned perfectly. Unlike Photoshop, these programs are all about recognizing the pinpoint stars we need. The method each software employs can vary, but they all give similar results.
We've got a lot of options to consider, but a few major players out there are Nebulosity, Prism, and MaximDL.
Nebulosity is an excellent choice for those just getting started in the hobby. It's got a straightforward user interface, it works for both Macs and PCs, and has a simple method for stacking and aligning. It's also the least expensive stacking software on the market.
If you are PC user want a bit more advanced features, check out Prism Lite. Its aligning and stacking method is high-speed, and it has great telescope functions found in more expensive software.
Regardless of which program anybody uses, the general process will look the same for stacking. Here's another flow chart breaking down the steps into each fundamental objective. Please note: We're purposely general with this chart to not exclude any software you might use.
You'll notice in the second step we mention "Adobe Camera Raw" and "Lightroom." These are the most common tools you're likely to already have as a photographer. Photoshop comes equipped with Adobe Camera Raw, which is super convenient, but Lightroom is another option that we like to use. Lightroom is an excellent tool for compiling all of your images and lets us perform a few blanketed pre-adjustments before stacking.
How to maximize your data for stacking
The whole goal of stacking is to maximize your data to strengthen the signal of whatever it is you are photographing. The more data you have, the better the signal is going to be. Here is what you can do to get the most data possible out of your images.
Shoot Raw
You'll want to save pictures in your camera's raw format for image processing. While it is possible to go through this process with the JPEG format, you would be throwing away 98% of the potential data recorded by doing so.
Expose to the right
Stacking, combined with exposure to the right (ETTR), yields the maximum possible data per image. If we're stacking those high-data shots, then we're maximizing our data potential for the final product.
Shoot as many images as possible
Taking multiple shots is kind of tricky because there is a point of diminishing returns. See the chart below.
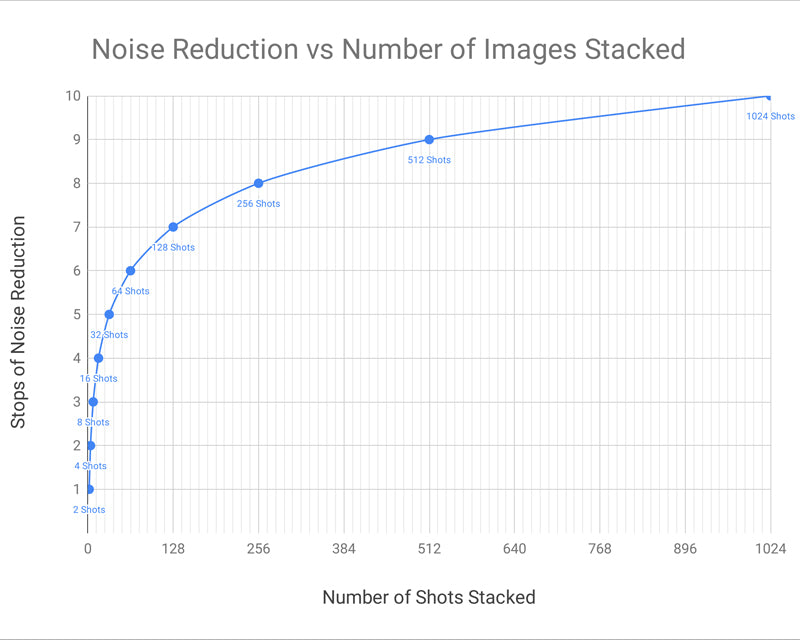
So if you want ISO 6400 to look like ISO 50 (seven-stop difference), you'll need to shoot about 128 images. If your camera has long exposure noise reduction turned on, and you're taking a 20-second exposure for each shot, that would take over an hour and a half to get all the shots!
Use a Tracker or EQ mount
When shooting a sequence over a long period of time and using only a tripod, you'll start to see the Earth's rotation in the final stacked image, leaving you with a smaller area in the framed image to be stacked. So basically, you get a smaller field of view after you crop out the unstacked areas.
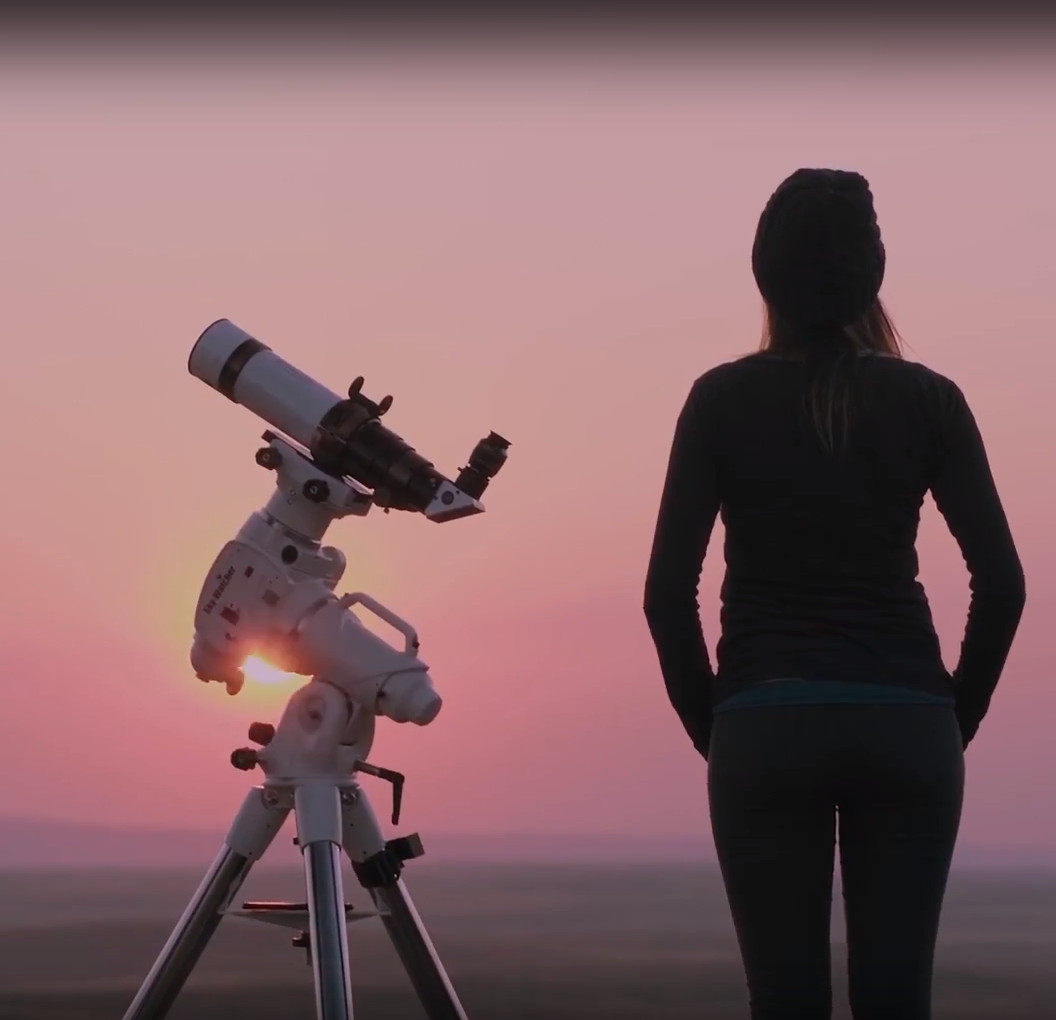
Remember those camera trackers we talked about in the DSLR Astrophotography Exposure blog? Those will come into play more than ever when stacking a bunch of exposures. Since trackers and EQ mounts rotate on the same axis as the Earth, your images should be free of the field rotation and cropping issue mentioned above.
We went over what the trackers are, but you might be wondering: What's an equatorial (EQ) mount? An EQ mount compensates for the Earth's rotation by rotating opposite to the Earth's spin just as trackers do. Still, one main difference between them is the EQ mount can have GoTo Technology functionality.
![]()
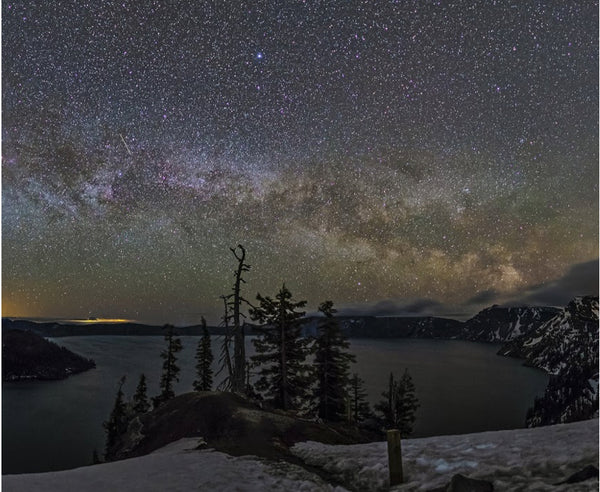
Most of the incredible pictures you see of the night sky were captured using one of these. Some deep space objects are particularly difficult or even impossible to image without a tracker because they're so small or faint to see through your LCD screen. The GoTo function will make sure you land on the target you want every time.
High-resolution, refined shots like you’ve seen on websites like everyclearnight.com or NASA’s astronomy picture of the day are often too precise to be done with a tripod alone. Targets will trail. That’s just physics. And if you’re forced to do shorter exposures you’ll need to up the ISO, further increasing the noise that shows so clearly in the dark skies.
The practice of stacking images benefits from tracking to extract the signal out of each shot fully.
That’s All, Folks!
We find ourselves again at the end of another entry in this DSLR Astrophotography series. If we've accomplished our goal, you should now have a foundational understanding of what stacking is and why it's the heart and soul of astrophotography processing.
Don't forget to follow us on Instagram @optcorp and use the hashtag #OPTeam for a chance to be featured on our page!
Next up, we're digging deep into the topic of camera trackers, EQ mounts, and how to get these set up for an optimal imaging experience. Stay safe out there, and keep looking up!


Richard Collins
December 11, 2022
You say “shoot raw” and that is something I am not sure about – with so many cameras, so many interfaces, and so many other fields that have the same sensors used in astrophotography. Some that probably could be. All your Astrophotography 101 are a bit too simplistic. It is better to give everything and have your pages intelligent enough to follow the pace of the users. I know you are trying to sell things, but you can also teach and build global communities of users and potential users.